Picking MaxWidth for PivotViewer Semantic Zoom
The benefit of creating an implementation of PivotViewer and Deep Zoom from scratch is that you get a better understanding for how it all works under the covers. (If you haven’t had a look at the HTML5 PivotViewer you can check it out here - http://pivot.lobsterpot.com.au/html5.htm)
The Silverlight 5 version of the PivotViewer control brings a whole heap of long awaited features including dynamic collections, item templates and Semantic Zoom. I’ve been playing around with item templates a bit lately as I prepare for my SQL Saturday talks later this month in Brisbane, Wellington and Adelaide and I thought I would go into a bit more detail on picking the correct MaxWidth for a PivotViewerItemTemplate.
If your unfamiliar with the Silverlight 5 PivotViewer item templates can be defined in XAML and data bound to items the PivotViewer controls ItemsSource. The item templates can be further enhanced by specifying a value for the MaxWidth property - a value that tells the control when to render the item/tile based on the current tile size or zoom level. For example creating three item templates, one with minimum detail for when the collection first loads, one with a little more detail when only a few tiles are visible and a final one for when only one tile is displayed would look something like this:
<pivot:PivotViewerItemTemplate MaxWidth="150">
	<Border Width="30" Height="20">
		<TextBlock Text="150" />
	</Border>
</pivot:PivotViewerItemTemplate>
<pivot:PivotViewerItemTemplate MaxWidth="500">
	<Border Width="30" Height="20">
		<TextBlock Text="500" />
	</Border>
</pivot:PivotViewerItemTemplate>
<pivot:PivotViewerItemTemplate>
	<Border Width="30" Height="20">
		<TextBlock Text="> 500" />
	</Border>
</pivot:PivotViewerItemTemplate>
While this example is simplistic - it only displays some text at each level, it demonstrates how the MaxWidth property is used to specify when to display a tile. The first template will get used until the tile becomes greater than 150 pixels, the second will be visible until 500 pixels and the last will be visible for all width after that.
While choosing a value for MaxWidth seems straightforward enough, having a closer look behind the scenes reveals that there is a little bit more to picking the right value. When we talk about MaxWidth what we are really referring to is the level at which the template applies, and when I say level I mean a level in the context of a Deep Zoom pyramid (http://msdn.microsoft.com/en-us/library/cc645077).
Even though the Silverlight 5 PivotViewer does away with the Deep Zoom dzc and dzi files, behind the scenes Deep Zoom tiles are still being rendered client side by Silverlight. Deep Zoom works by splitting up an image into smaller pieces where the widths equal a power of 2.
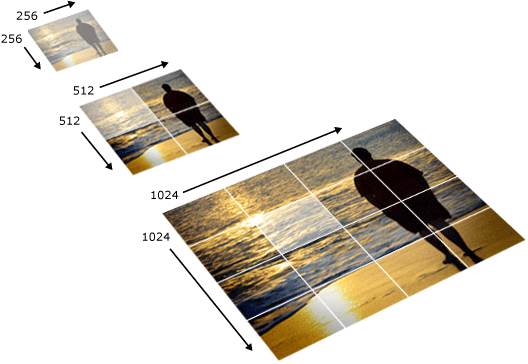
In the context of PivotViewer the current level is determined by the current width of the tile rounded down to the nearest power of 2. For example if the tile is 256 pixels wide then it is at level 8 (2^8), and when it’s 300 pixels wide it also gets rounded down to level 8.
Note: The formula to work out the level based on the width is: Floor(Log(width)/Log(2)).
To put this to the test I created 4 tile templates with the MaxWidth set to 300, 500, 700 and > 700. The result was that only the tiles with a MaxWidth of 300, 700 and > 700 were actually rendered by PivotViewer - it was if the item template with the MaxWidth set to 500 was never defined.
Unfortunately the official documentation mentions nothing about this (or anything really: http://msdn.microsoft.com/en-us/library/system.windows.controls.pivot.pivotvieweritemtemplate.maxwidth(v=vs.95).aspx) but as the item templates get converted to Deep Zoom behind the scenes, the MaxWidth of an item template can really only be set to powers of 2.